Top 10 Linux Virtualization Software
Linux Virtualization is the latest buzz word. You may wonder computers are getting cheaper every day, why should I care and why should I use virtualization? Virtualization is a broad term that refers to the abstraction of computer resources such as:
-
Platform Virtualization
-
Resource Virtualization
-
Storage Virtualization
-
Network Virtualization
-
Desktop Virtualization
This article describes why you need Linux Virtualization and list commonly used FOSS and proprietary Linux virtualization software.
Why should I use Virtualization?
-
Consolidation – It means combining multiple software workloads on one computer system. You can run various virtual machines in order to save money and power (electricity).
-
Testing – You can test various configuration. You can create less resource hungry and low priority virtual machines (VM). Often, I test new Linux distro inside VM. This is also good for students who wish to learn new operating systems and programming languages / database without making any changes to working environment. At my work place I give developers virtual test machines for testing and debugging their software.
-
Security and Isolation – If mail server or any other app gets cracked, only that VM will be under control of the attacker. Also, isolation means misbehaving apps (e.g. memory leaks) cannot bring down whole server.
Open Source Linux Virtualization Software
-
OpenVZ is an operating system-level virtualization technology based on the Linux kernel and operating system.
-
Xen is a virtual machine monitor for 32 / 64 bit Intel / AMD (IA 64) and PowerPC 970 architectures. It allows several guest operating systems to be executed on the same computer hardware concurrently. XEN is included with most popular Linux distributions such as Debian, Ubuntu, CentOS, RHEL, Fedora and many others.
-
Kernel-based Virtual Machine (KVM) is a Linux kernel virtualization infrastructure. KVM currently supports native virtualization using Intel VT or AMD-V. A wide variety of guest operating systems work with KVM, including many flavours of Linux, BSD, Solaris, and Windows etc. KVM is included with Debian, OpenSuse and other Linux distributions.
-
Linux-VServer is a virtual private server implementation done by adding operating system-level virtualization capabilities to the Linux kernel.
-
VirtualBox is an x86 virtualization software package, developed by Sun Microsystems as part of its Sun xVM virtualization platform. Supported host operating systems include Linux, Mac OS X, OS/2 Warp, Windows XP or Vista, and Solaris, while supported guest operating systems include FreeBSD, Linux, OpenBSD, OS/2 Warp, Windows and Solaris.
-
Bochs is a portable x86 and AMD64 PC emulator and debugger. Many guest operating systems can be run using the emulator including DOS, several versions of Microsoft Windows, BSDs, Linux, AmigaOS, Rhapsody and MorphOS. Bochs can run on many host operating systems, like Windows, Windows Mobile, Linux and Mac OS X.
-
User Mode Linux (UML) was the first virtualization technology for Linux. User-mode Linux is generally considered to have lower performance than some competing technologies, such as Xen and OpenVZ. Future work in adding support for x86 virtualization to UML may reduce this disadvantage.
Proprietary Linux Virtualization Software
-
VMware ESX Server and VMWare Server – VMware Server (also known as GSX Server) is an entry-level server virtualization software. VMware ESX Server is an enterprise-level virtualization product providing data center virtualization. It can run various guest operating systems such as FreeBSD, Linux, Solaris, Windows and others.
-
Commercial implementations of XEN available with various features and support.
-
Citrix XenServer : XenServer is based on the open source Xen hypervisor, an exceptionally lean technology that delivers low overhead and near-native performance.
-
Oracle VM : Oracle VM is based on the open-source Xen hypervisor technology, supports both Windows and Linux guests and includes an integrated Web browser based management console. Oracle VM features fully tested and certified Oracle Applications stack in an enterprise virtualization environment.
-
Sun xVM : The xVM Server uses a bare-metal hypervisor based on the open source Xen under a Solaris environment on x86-64 systems. On SPARC systems, xVM is based on Sun’s Logical Domains and Solaris. Sun plans to support Microsoft Windows (on x86-64 systems only), Linux, and Solaris as guest operating systems.
-
-
Parallels Virtuozzo Containers – It is an operating system-level virtualization product designed for large-scale homegenous server environments and data centers. Parallels Virtuozzo Containers is compatible with x86, x86-64 and IA-64 platforms. You can run various Linux distributions inside Parallels Virtuozzo Containers.
Personally, I’ve used VMware ESX / Server and VirtualBox.
METHODS FOR MIGRATION OF VM’S IN LINUX HOST TO WINDOWS HOST
In Linux the virtualization tool used can be one of the above mentioned. Let us take the case of VIRTUAL BOX. The guest in VBOX will have an extension “.vdi” and in WINDOWS HYPER-V it will be “.vhd”. The steps for converting .vdi to .vhd are given below:
There are times when you use Virtualbox and for some reason need to convert over to VMWare or Hyper-V (or other).
Finding this process on the Internet is tedious, and usually involves using QEMU, an open-source Virtualization product to perform the .raw –> .vmdk step. However, if you are running on Windows, the QEMU Windows port will not perform the conversion without failure (at least on Windows 7!). So with that, I decided to go another route with a handy tool that I’ve used for years in some variation or another, WinImage.
Tools you’ll need:
. Sun VirtualBox – http://www.virtualbox.org. WinImage (Shareware) – http://www.winimage.com
Requirements:
Free disk space should be around 2 times the size of the .vdi disk image file size.
For the sake of this document, we will use .vmdk as our output file, but the conversion steps are the same when it comes to .vhd.
|
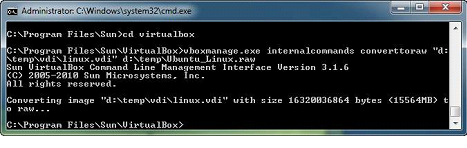
Convert the .vdi file to a raw disk image (.raw) Perform a search on your system for existing .vdi files that you are going to convert.
vboxmanage.exe internalcommands converttoraw “x\path-to-vdi\diskimage.vdi” “x:\path-to-output-folder\diskimage.raw” Depending on the size of your .vdi file, the time for conversion may greatly vary. Also, be sure you have around 2 times the available drive space that your existing .vdi currently consumes on your logical volume. i.e. if you have a 16gb .vdi file, just to be safe, I would make sure you have 32Gb free on your physical disk to ensure the conversion process can complete without errors. Usually you won’t need this much, but it is good to be safe. |
||
Convert .raw disk image to .vmdk format using WinImage
-
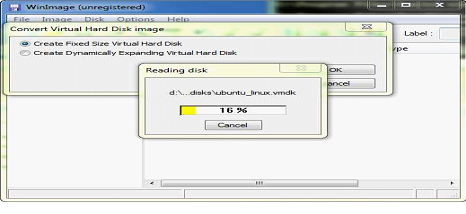
Open WinImage, click on ‘Disk’> ‘Convert Virtual Hard Disk image…’
-
Next to the ‘File name:’ field, click on the file type drop-down and select ‘All files (*.*)’.
-
Navigate to the location where you stored your outputted .raw disk file and double-click it.
-
Choose whether you wish to ‘Create Fixed Size Virtual Hard Disk’ or ‘Create Dynamically Expanding Virtual Hard Disk’ (I typically pick the latter) and click ‘OK’.
-
Navigate to a folder where you wish to store the newly converted image to. Next to ‘Save as type:’ (for the sake of this How-to) choose ‘VMWare VMDK (*.vmdk). and click ‘Save’.You should see a ‘Reading disk’ progress indicator giving you the status of the conversion process. I’ve converted 30Gb images in about 10 minutes or less…but I have no firm numbers.
-
Once the conversion is complete, you’ll see a dialog box that will ask you if you wish to connect to the partition. Click ‘OK’ if you wish to view the content.
Import your disk images into your existing Virtual Infrastructure
Now that the files are converted, copy or move your converted disk image files to your virtualization software’s datastore/disk storage folder.
Once moved/copied, you should now be able to create a new Virtual Machine and utilize the disks you just converted.
Note that you will need to install the proper guest additions/tools to the virtual machine when you get it booted, so you will likely not have network access right off the bat.
Conclusion
Indeed, that was a quick How-to, but it’s an important process that gets easily overlooked. The hire remote linux engineer WinImage step makes quick work of converting the .raw image…and it is easy!