
How to install Kaltura? Kaltura is the world’s first Open Source Online Video Platform, providing both enterprise level commercial software and services, fully supported and maintained by Kaltura, as well as free open-source community supported solutions, for video publishing, management, syndication and monetization.
Kaltura offering different deployment options according to one’s necessity. The various deployment options are as follows as
- Kaltura SaaS Edition
- Kaltura On-Prem Edition
- Kaltura Community Edition
- Kaltura Cloud Edition
Kaltura provides different services like Streaming, Transcoding, Advertising, GeoIP, Syndication, Distribution, Security, Monitoring and more. You can easily integrate Kaltura with different Content Management Systems and Learning Management Systems like WordPress, Joomla, Drupal, Moodle, Sakai, Blackboard, Microsoft Sharepoint.
Now let me explain about how to install kaltura in CentOS Here i chose community edition for installtion. Before going to install Kaltura CE 5 you need to satisfy the prerequisites of Hardware and Software Requirements.
Prerequisites
Hardware Specifications
The Hardware requirements should vary according to the expected usage estimations. The minimum requirements to install Kaltura is as follow as
- 1 GB RAM
- 2GHz + Dual Core Processor (preferably Multi-Core Intel based)
- 5 GB Free Hard disk Space [ It depends upon the usage, but 5 GB is enough for the installation ]
Software Specifications
- Web Server ( Apache )
- Database Server ( MySQL )
- Mail Server ( SMTP / Postfix )
- Application Packages ( Java, PHP )
- Monitoring ( Xymon – This is optional)
Before going to start installation, just update your repository
yum update
You need to install the following basic required packages in order to continue the installation
yum install vim gcc make rsync
yum install httpd httpd-devel
Open the apache configuration file and enable the modules and the configuration file should be like this
vim /etc/httpd/conf/httpd.conf
LoadModule rewrite_module modules/mod_rewrite.so
LoadModule headers_module modules/mod_headers.so
LoadModule expires_module modules/mod_expires.so
LoadModule filter_module modules/mod_filter.so
LoadModule deflate_module modules/mod_deflate.so
LoadModule env_module modules/mod_env.so
LoadModule proxy_module modules/mod_proxy.so
save and quit the file
You need to enable file_cache module, But unfortunately there is no apache file_cache package in the CentOS default repository. So you need to compile it from source
Download the same version of apache source code
wget http://olex.openlogic.com/content/openlogic/apache/2.2.15/openlogic-apache-2.2.15-all-src-1.zip
unzip openlogic-apache-2.2.15-all-src-1.zip
cd apache-2.2.15-src/modules/cache/
apxs -i -a -c mod_file_cache.c
It will automatically enable the file_cache module in your httpd.conf
cat /etc/httpd/conf/httpd.conf
LoadModule file_cache_module /usr/lib64/httpd/modules/mod_file_cache.so
Now start the apache server by using the init scripts
/etc/init.d/httpd start
PHP Installation
Kaltura requires some additional php extensions, so you need to install those extensions too. Run the following command to install php, php-cli and the additional extensions
yum install php php-cli php-devel php-gd php-mbstring php-xml php-pecl-memcache.x86_64 php-pecl-memcached.x86_64 php-mysql php-pecl-apc php-bcmath
Its always wise to create a phpinfo file to check the LAMP Server information
vim /var/www/html/phpinfo.php
<?php
phpinfo();
?>
Now open the /etc/php.ini file and enable the request_option with the value ” CGP ”
vim /etc/php.ini
request_order = "CGP"
Change the date.timezone values to your timezone value
date.timezone = Asia/Delhi
date.default_latitude = 28.40
date.default_longitude = 77.13
Note : All the date.timezone information are avail at http://php.net/manual/en/datetime.configuration.php . Please check it for your timezone values
MySQL Installation
yum install mysql mysql-server mysql-devel
Set MySQL password
/usr/bin/mysqladmin -u root password 'kaltura'
You can login mysql by using the following command
mysql -u root -p
You need to set mysql default character to UTF-8 and also add the following lines in it
lower_case_table_names = 1
thread_stack = 262144
open_files_limit = 20000
Open my.cnf file
vim /etc/my.cnf
[mysqld]
datadir=/var/lib/
mysqlsocket=/var/lib/mysql/mysql.sock
user=mysql
# Disabling symbolic-links is recommended to prevent assorted security risks
symbolic-links=0
character-set-server = utf8
lower_case_table_names = 1
thread_stack = 262144
open_files_limit = 20000
[mysqld_safe]
log-error=/var/log/mysqld.log
pid-file=/var/run/mysqld/mysqld.pid
[client]
default-character-set = utf8
save and quit the file.
Curl Installation
Kaltura requires curl, run the following command to install curl and its development packages
yum install libcurl-devel perl-WWW-Curl python-pycurl curl.x86_64 libcurl
Memcached Installation
yum install memcached libmemcached libmemcached-devel php-pecl-memcache python-memcached.noarch perl-Cache-Memcached.noarch
ImageMagick Installation
yum install ImageMagick-c++ ImageMagick-c++-devel ImageMagick-devel ImageMagick-perl ImageMagick autotrace
Kaltura requires some additional 32 bit packages in 64 bit host
yum install zlib.i686 glibc.i686 ncurses-libs freetype bzip2-libs
Java Runtime Environment Installation
wget http://download.oracle.com/otn-pub/java/jdk/7u5-b05/jre-7u5-linux-x64.rpm?AuthParam=1341060304_96e260b78fd3b2a30f05f2353152170d
mv jre-7u5-linux-x64.rpm\?AuthParam\=1341060304_96e260b78fd3b2a30f05f2353152170d jre-7u5-linux-x64.rpm
rpm -ivh jre-7u5-linux-x64.rpm
Pentaho data integration
The pentaho data integration package (version 3.2) is required for the analytics module. It should be downloaded and extracted to the/usr/local/pentaho/pdi directory
Create the /usr/local/pentaho/ directory.
mkdir /usr/local/pentaho/
Change to the/usr/local/pentaho/directory.
cd /usr/local/pentaho/
Download the pentaho data-integration package.
wget http://sourceforge.net/projects/pentaho/files/Data%20Integration/3.2.0-stable/pdi-ce-3.2.0-stable.tar.gz/download
Extract the pentaho data-integration package.
tar xvfz pdi-ce-3.2.0-stable.tar.gz -C /usr/local/pentaho
Rename the data-integration root directory into pdi.
mv data-integration pdi
Mail Server
Either you can install postfix or sendmail
yum install postfix
Xymon – Monitoring Tool
Download Xymon from sourceforge
wget http://sourceforge.net/projects/xymon/files/latest/download
Xymon requires rrdtools and pcre. So install those packages before to proceed
yum install rrdtool rrdtool-devel rrdtool-tcl rrdtool-ruby rrdtool-python rrdtool-php rrdtool-perl pcre pcre-static pcre-devel mingw32-pcre.noarch
After completing this installation start the xymon installation. You can install Xymon by simple steps
./configure
make
make install
During the installation it will prompt you many queries, give the proper answer else the installation process will exit and dont forget to disable the selinux
Disable SELinux
vim /etc/sysconfig/selinux
selinux = disabled
Now fireup your browser to www.kaltura.org and download Kaltura CE 5 Eagle
wget http://www.kaltura.org/releases/kalturaCE/29044
tar -xzvf kalturaCE_v5.0.0.tgz
cd kalturaCE_v5.0.0
Run the php installation scripts
php install.php
Thank you for installing Kaltura Video Platform – Community Edition
In order to improve Kaltura Community Edition, we would like your permission to send system data to Kaltura.This information will be used exclusively for improving our software and our service quality. I agree (Y/n)> y
If you wish, please provide your email address so that we can offer you future assistance (leave empty to pass)> mailbox@dummyurl.com
Please provide the following information:
The following apachectl script has been detected: /usr/sbin/apachectl. Do you want to use this script to run your Kaltura application? Leave empty to use or provide a pathname to an alternative apachectl script on your server.> y
The following PHP binary has been detected: /usr/bin/php. Do you want to use this script to run your Kaltura application? Leave empty to use or provide a pathname to an alternative PHP binary on your server.> y
Full target directory path for Kaltura application (leave empty for /opt/kaltura)>
Please enter the domain name/virtual hostname that will be used for the Kaltura server (without http://)> newkaltura.info
Your primary system administrator email address> mailbox@dummyurl.com
The password you want to set for your primary administrator> kaltura
Database host (leave empty for ‘localhost’)>
Database port (leave empty for ‘3306’)>
Database username (with create & write privileges)> root
Database password (leave empty for no password)> kaltura
The URL to your xymon/hobbit monitoring location. Xymon is an optional installation. Leave empty to set manually laterExamples:http://www.xymondomain.com/xymon/http://www.xymondomain.com/hobbit/> http://abcdnewkaltura.info
Verifing prerequisites
Checking for leftovers from a previous installation
Installation is now ready to begin. Start installation now? (Y/n)> y
Copying application files to /opt/kalturacurrent working dir is /usr/local/src/kalturaCE_v5.0.0
Copying binaries for linux 64bitReplacing configuration tokens in files
Changing permissions of directories and files
Creating and initializing ‘kaltura’ database
Creating and initializing ‘kaltura_sphinx_log’ database
Creating data warehouse
Creating Dynamic Enums
Configure sphinx
Populate sphinx tables
Changing permissions of directories and files
Creating system symbolic links
Deploying uiconfs in order to configure the application
Creating the uninstaller
Running the generate script
Running the batch manager
Running the sphinx search deamon
Executing sphinx dameon
Executing in background nohup /opt/kaltura/app/plugins/sphinx_search/scripts/watch.daemon.onprem.sh
Executing in background chkconfig sphinx_watch.sh on
Changing permissions of directories and files
postdrop: warning: unable to look up public/pickup: No such file or directory
Post installation email cannot be sent
Installation Completed Successfully.
Your Kaltura Admin Console credentials:
System Admin user: mailbox@dummyurl.com
System Admin password: kaltura
Please keep this information for future use.
To start using Kaltura, please complete the following steps:
1. Add the following line to your /etc/hosts file: 127.0.0.1 newkaltura.info
2. Add the following line to your Apache configurations file (Usually called httpd.conf or apache2.conf): Include /opt/kaltura/app/configurations/apache/my_kaltura.conf
3. Restart apache
4. Browse to your Kaltura start page at: http://newkaltura.info/start
Open your httpd.conf file and add the following line in the appropriate section and restart the apache server
Include /opt/kaltura/app/configurations/apache/my_kaltura.conf
Restart Apache server
/etc/init.d/httpd restart
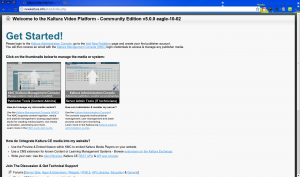
Now fireup your browser with http://newkaltura.info you will get Kaltura page in your screen as shown below
Happy Streaming with Kaltura 🙂

