FreeNAS is an open source storage platform based on Freebsd and supports sharing across Windows,Apple and Unix-like systems. It is an operating system that can
Read more
FreeNAS is an open source storage platform based on Freebsd and supports sharing across Windows,Apple and Unix-like systems. It is an operating system that can
Read moreWhat is Puppet ?======================Introduction to Puppet ,a software which is using for system automation and management. It manages your servers, your described machine configurations in
Read more
Realizing the growth of Ruby on Rails potential and scope for development of both countries’,India and Japan, eminent representatives from Japan had come down for
Read more
Glad News ! Onapp’s Official Support “SparkMyCloud Partners with the UK based Cloud Automation Company Onapp ! “ SparkSupport’s Cloud Arm ‘SparkMyCloud’ has created another
Read more
SparkMyCloud Engineers have done quiet alot of migration to aws cloud projects for European and Middle East clients’.And,also SparkMyCloud migration services follows a similiar cloud
Read more
Introduction on MySQL and performance tuning MySQL is the most widely used open source relational database management system (RDBMS) and act as a database server
Read more
Bash Scripting , I recently came across a situation where i had to perform certain task on a random file ( of particular extension )
Read more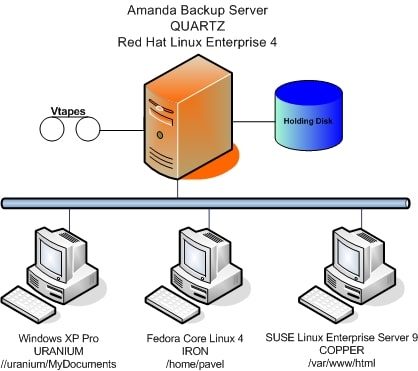
Amanda Backup System Utility AMANDA is an opensource backup utility it allows to set up a single master backup server to back up multiple hosts
Read more
Have you ever thought about performance Perl Application Tuning ? Read-on to get a starting ! Identifying Performance Issues The first task at hand in
Read more