Xen provides couple of different networking options like bridge networking, nat networking and route networking. Bridging is a technique used for connecting different network segments. It is the default option for Xen networking as it simply connects all the virtual machines to the outside world through virtual network interfaces connected to the bridges created by Xen. When using bridged networking, Xen creates a network bridge and then connects the actual physical network interface to this bridge. Virtual network interfaces are then created for dom0 and each of the guest domains; these are all attached to the network bridge. In this manner, all the domains can connect to any address to which the physical network interface can connect.
In the Xend configuration file /etc/xen/xend-config.sxp, the default directives related to the virtual network are shown below. Notice that the network-bridge and vif-bridge lines are the only ones uncommented. These are the lines needed for bridged networking.
[bash]
(network-script network-bridge)
(vif-script vif-bridge)
# (network-script network-route)
# (vif-script vif-route)
# (network-script network-nat)
# (vif-script vif-nat)
[/bash]
The network script network-bridge is in the directory /etc/xen/scripts. It sets up the networking environment and uses the bridge-utils tool to set up the software bridge xenbr0. The vif script vif-bridge is also in the same directory as the network script. It sets up the backend vif for the guest domain when a guest domain boots up.
Before creating any guest domains if you check the network interfaces in Dom0 by typing ‘ifconfig’ command, you can see an output like the following.
[root@localhost xen]# ifconfig
eth0
   Link encap:Ethernet  HWaddr 48:5B:39:89:E5:43
       inet addr:192.168.1.86  Bcast:192.168.1.255 Mask:255.255.255.0
lo
    Link encap:Local Loopback
       inet addr:127.0.0.1  Mask:255.0.0.0
peth0
  Link encap:Ethernet  HWaddr FE:FF:FF:FF:FF:FF
       inet6 addr: fe80::fcff:ffff:feff:ffff/64 Scope:Link
vif0.0
 Link encap:Ethernet  HWaddr FE:FF:FF:FF:FF:FF
       inet6 addr: fe80::fcff:ffff:feff:ffff/64 Scope:Link
xenbr0
 Link encap:Ethernet  HWaddr B2:8B:2C:4C:ED:0E
       UP BROADCAST RUNNING NOARP  MTU:1500 Metric:1
You may be wondering how and when all these network interfaces are created. Here is the sequence of events that happen when you boot up your Xen server and xend starts up (only dom0 is started and no guest domains set to auto start by xend. I only have one physical network interface on my server and it is named eth0).
1. Execute the /etc/xen/scripts/network-bridge script in /etc/xen/xend-config.sxp
2. This will create a new network bridge called xenbr0.
3. Copy the MAC address and IP address from the physical network
interface eth0.
4. Stop the physical network interface eth0.
5. Create a new pair of connected virtual ethernet interfaces—veth0 and vif0.0.
6. Assign the previously copied MAC address and IP address to the virtual interface veth0.
7. Rename the physical network interface to peth0 from eth0.
8. Rename the virtual network interface veth0 to eth0.
9. Attach peth0 and vif0.0 to the bridge xenbr0.
10. Bring up the bridge xenbr0, and the network interfaces peth0, eth0, and vif0.0.
For each new domU, Xen creates a new pair of “connected virtual ethernet interfaces”, with one end in domU and the other in dom0. For linux domU’s, the device name it sees is named eth0. The other end of that virtual ethernet interface pair exists within dom0 as interface vif<id#>.0. When a domU is shutdown, the virtual ethernet interfaces for it are deleted.
when a domU starts up, xend (running in dom0) runs the vif-bridge script, which:
– attaches vif<id#>.0 to xenbr0
– vif<id#>.0 is brought up
So you would be able to see additional network interfaces after creating new guest domains.
[root@localhost xen]# ifconfig
eth0
   Link encap:Ethernet  HWaddr 48:5B:39:89:E5:43
       inet addr:192.168.1.86  Bcast:192.168.1.255  Mask:255.255.255.0
lo
     Link encap:Local Loopback
       inet addr:127.0.0.1  Mask:255.0.0.0
peth0
  Link encap:Ethernet  HWaddr FE:FF:FF:FF:FF:FF
       inet6 addr: fe80::fcff:ffff:feff:ffff/64 Scope:Link
vif0.0
 Link encap:Ethernet  HWaddr FE:FF:FF:FF:FF:FF
       inet6 addr: fe80::fcff:ffff:feff:ffff/64 Scope:Link
vif1.0
 Link encap:Ethernet  HWaddr FE:FF:FF:FF:FF:FF
       inet6 addr: fe80::fcff:ffff:feff:ffff/64 Scope:Link
vif2.0
 Link encap:Ethernet  HWaddr FE:FF:FF:FF:FF:FF
       inet6 addr: fe80::fcff:ffff:feff:ffff/64 Scope:Link
xenbr0
 Link encap:Ethernet  HWaddr B2:8B:2C:4C:ED:0E
       UP BROADCAST RUNNING NOARP  MTU:1500 Metric:1
Here you can see the newly added interfaces vif1.0 and vif2.0 , which are virtual interfaces for the new guest domains created.
Inside the guest domain, the network interfaces look the same as on a typical machine.
[user@DomU]# ifconfig -a
eth0   Link encap:Ethernet  HWaddr 00:16:3E:5A:32:DA
       inet addr:128.153.144.96 Bcast:128.153.145.255 Mask:255.255.254.0
       inet6 addr: fe80::216:3eff:fe5a:32da/64 Scope:Link
lo     Link encap:Local Loopback
       inet addr:127.0.0.1  Mask:255.0.0.0
       inet6 addr: ::1/128 Scope:Host
In a guest domain, whether the Xen network is in bridging mode or routing mode, the network interface looks the same as it would in a nonvirtualized machine.
Each DomU (guest domain) have a configuration file where we can specify the network settings associated with that domain. It is specified as the following in the corresponding configuration file.
[bash]
vif = [mac=00:16:3E:02:00:41,bridge=xenbr0′ ]
[/bash]
vif: Specifies the virtual network interface configuration for the domain. This is provided in the following format:
vif = [ “key1 = value1”, “key2 = value2” ]
The common options used for this configuration directive are
bridge: Specifies the network bridge that will be used for this interface.
mac: Specifies the MAC address for this virtual interface.
If you do not provide a MAC address, it is set to a random MAC address by Xen on boot.The random address is selected from the range of addresses assigned to Xensource by IEEE. At this point you understand how all the interfaces that have been listed in Dom0 are created
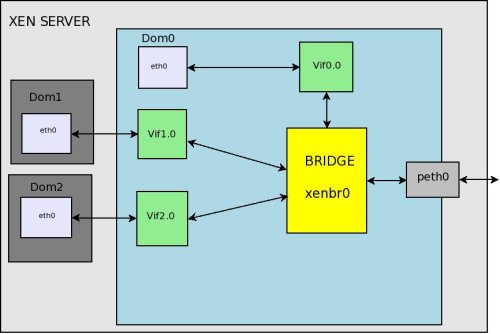
and what they mean. Next we can have a look at the packet flow in bridged networking. For that please refer the following figure.
.
.
Packet arrives at hardware, is handled by dom0 Ethernet driver and appears on peth0. peth0 is bound to to the bridge, so its passed to the bridge from there.We can see that peth0, xenbr0, vif0.0, and vif1.0 are sharing the same MAC address FE:FF:FF:FF:FF:FF, which is the Ethernet broadcast address. This indicates that the physical interface, the loopback device of Domain0, and the backend interfaces of guest domains are all broadcasting to the bridge interface xenbr0. When the physical network interface receives the packets, it sends them all directly to the bridge interface xenbr0. Now the bridge distributes the packet, just like a switch would.The software bridge determines which domain’s backend interface to forward those packets to by the receiver’s MAC addresses. So, peth0 does not need to have an IP, only a MAC address. The vif interface puts the packet into Xen, which then puts the packet back to the domain the vif leads to.Its also done that way for dom0, hence the vif0.0->eth0 pair.
If you want to use a bridge name other than the default one( xenbr0) you can specify it in the xend configuration file like the following.
[bash]
(network-script ‘network-bridge bridge=<name>’)
[/bash]
where <name> is the desired name of bridge.
Note also that network-bridge defaults to binding eth0 to the bridge. To change the physical network card, use
[bash]
(network-script ‘network-bridge bridge=<name> netdev=eth1’)
[/bash]
If a server has more than one physical network interface, it may be useful to separate traffic between interfaces by creating additional bridges. In this way, one could connect xenbr0 to peth0 and xenbr1 to peth1 and give a virtual machine in say dom1 exclusive access to xenbr1. Everything necessary for this is present in the network-bridge script.
While useful from the command line, the /etc/xen/xend-config.sxp script will require some tuning in order to create bridges automatically during boot. By default, this script calls the network-bridge script; however, this script can only be called once. To avoid this problem, you need to create a network-wrapper script, which can be configured to call the network-bridge script twice. Use the following steps to configure this on Xen Bridge Networking
1. Create a script /etc/xen/scripts/network-wrapper with the following contents:
[bash]
#!/bin/sh
/etc/xen/scripts/network-bridge $1 netdev=eth0 bridge=xenbr0
/etc/xen/scripts/network-bridge $1 netdev=eth1 bridge=xenbr1
[/bash]
Tune the /etc/xen/xend-config.sxp script so that it calls this network wrapper script, by adding the following:
[bash]
(network-script network-bridge-wrapper)
[/bash]
3. Make sure that in the configuration file for each of the unprivileged domains, you indicate what network bridge to use. This would make the vif lines look like the following example line:
[bash]
vif=[ ‘bridge=xenbr1’, ‘mac=00:16:3e:07:d2:0e’, ]
[/bash]