FreeNAS is an open source storage platform based on Freebsd and supports sharing across Windows,Apple and Unix-like systems. It is an operating system that can be installed on virtual machines or in physical machines to share data storage via computer network.The introduction to freenas Project and software were originally founded by Olivier Cochard-Labbe in 2005 on the principle that network storage be made available to the world at no coast.FreeNAS uses the ZFS file system, which supports high storage capacities and integrates file systems and volume management into a single piece of software.
Why Introduction to Freenas?
The benefit of using a NAS is that all your important files can be stored in a central location, allowing you to access them from multiple devices simultaneously, while also keeping our backupdata and redundancy resources in one place.It is designed around the OpenZFS filesystem, which enables many of the advanced features of FreeNAS such as data integrity, early indication of faulty drives, and the ability to boot into a previous working copy of the operating system after a failed upgrade.It is based on the highly secure FreeBSD operating system and follows security best practices in development.
How Introduction To Freenas Features
Storage Made Simple
A key feature of introduction to freenas is ZFS(Zettabyte File System).ZFS is an open source combined file system and logical volume manager originally created by sun microsystems, now Oracle Corporation.The filesystem is having a powerful punch of features
ZFS features
Copy-on-write : ZFS uses a copy-on-write transactional model. When editing a file, original disk blocks are not altered. It allows versioning and rollback
Massive Scalability: Up to 256 zebibytes
Compression : Compression is transparent with ZFS if you enable it. This means that every file you store in your pool can be compressed. It is a block level compression type not file level.Multiple types of compression are supported, such as: lzjb, gzip, zle,lz4. It should make to improve the IO performance
Cache management : ZFS uses different layers of disk cache to speed up read and write operations.For write caching, ZFS employs the ZFS Intent Log (ZIL), We can add a ssd as ZIL for writing the cache for the Zpool that we are configuring like cachecade servers(hardware raid). This makes to improve the iops performance.
Snapshots and clones : An advantage of copy-on-write is that, when ZFS writes new data, the blocks containing the old data can be retained, allowing a snapshot version of the file system to be maintained. ZFS snapshots are created very quickly, since all the data composing the snapshot is already stored. They are also space efficient, since any unchanged data is shared among the file system and its snapshots.
Storage Pools : Unlike traditional file systems that must have a fixed-size disk geometry, you create pools with the disks you have and add your disks and create filesystems with the geometry and configuration you need from the pool.
Continuous Integrity Checking – ZFS keeps a continuous checksum of the data. It does this by creating and verifying checksums as data is written to disk.
Deduplication : Deduplication is the process of eliminating duplicate copies of data. Dedup is generally either file-level, block-level, or byte-level. Chunks of data files, blocks, or byte ranges are checksummed using some hash function that uniquely identifies data with very high probability. It should make us to provide better utilize of disk space.
Thin Provisioning : It is a method of optimizing the efficiency with which the available space is utilized in storage area networks (SAN). TP operates by allocating disk storage space in a flexible manner among multiple users, based on the minimum space required by each user at any given time.
RAID – Many types of RAID are supported: Stripe, Mirror, RAIDZ.
RAIDZ – This type of software RAID overcomes the write hole. No need for expensive RAID cards (although they are supported in JBOD (Just a Bunch of Disks) mode).RAIDZ types are RAIDZ1, RAIDZ2, and RAIDZ3. The number (e.g., 1-3) represents the number of drives that can fail per virtual device without losing the pool. Parity is distributed across all disks.
The FreeNAS ZFS Volume Manager guides the user toward a configuration that is optimized for the number of disks available.

ZFS Volume Manager
The introduction to freenas graphical interface also configuration of nested ZFS datasets within filesystems.ZFS datasets are like subdirectories that have configurable properties independent of their parent filesystem, such as the ability to configure compression or deduplication on a per-dataset basis. ZFS datasets can also be configured with quotas and reserved space, making them useful for thin-provisioning scenarios. Snapshots of datasets can be scheduled separately from the parent file system, or they can be included recursively in a snapshot of the parent volume.
Core Services Configuration
The Services section of the GUI allows you to configure, start, and stop the various services that ship with the FreeNAS system. FreeNAS supports the following built-in services such as AFP, CIFS, Dynamic DNS, FTP, ISCSI, etc.. By introduction to Freenas provides support for network based file based protocols, including CIFS and NFS.CIFS (Common Internet File System) are commonly used in Windows environments or those with a mixture of Windows and Unix-like operating systems. NFS (Network File System) is commonly used for high-performance applications and in heterogeneous environments.Each service can be configured from its corresponding icons.
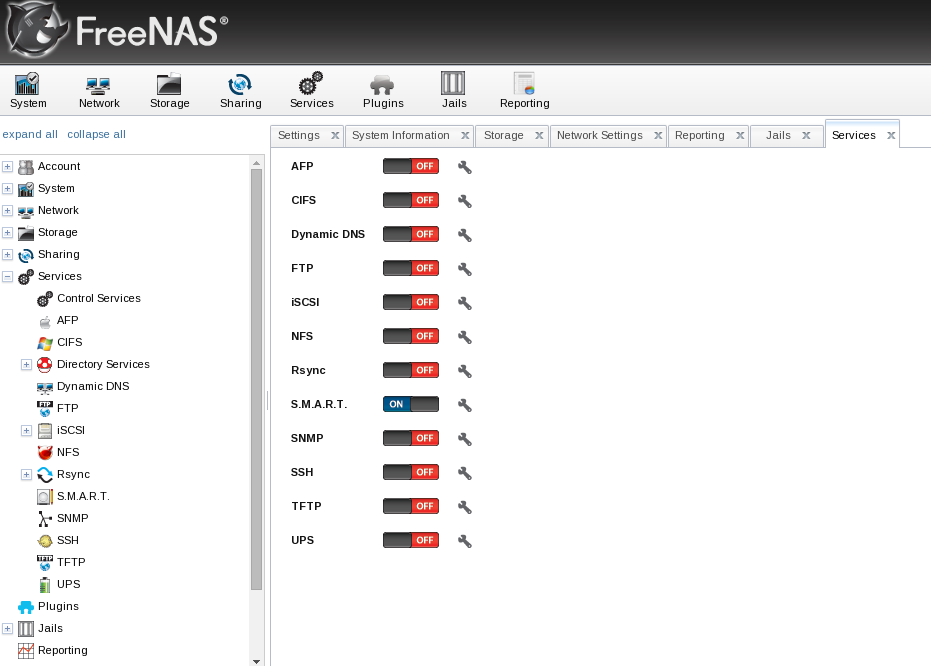
Service Configuration
Replication
ZFS Snapshots are more than just local backups. They can be used to create remote backups as well. Here we are using the sending and receiving snapshot feature. Furthermore, additional snapshots of the same filesystem can be sent incrementally, reducing the size of each backup to the changes that were made between snapshots. In case of damage to a local ZFS filesystem such as disk failure in excess of parity protection or irrecoverable log device failure, any backed-up snapshot can be sent to a new ZFS filesystem, recovering all data up to that backup.
Snapshots
Snapshots can be made on a one-off basis or scheduled as a cron job from the web interface. At any time, the entire filesystem can be rolled back to the most recent snapshot. Snapshots can be created quickly and, if little data changes, new snapshots take up very little space. Older snapshots can be cloned and accessed to recover data from that version of the filesystem. A periodic snapshot task allows you to schedule the creation of read-only versions of ZFS volumes and datasets at a given point in time. From the web interface, users can see how much space a particular snapshot is occupying on the volume and delete, clone, or roll back to individual snapshots as needed.
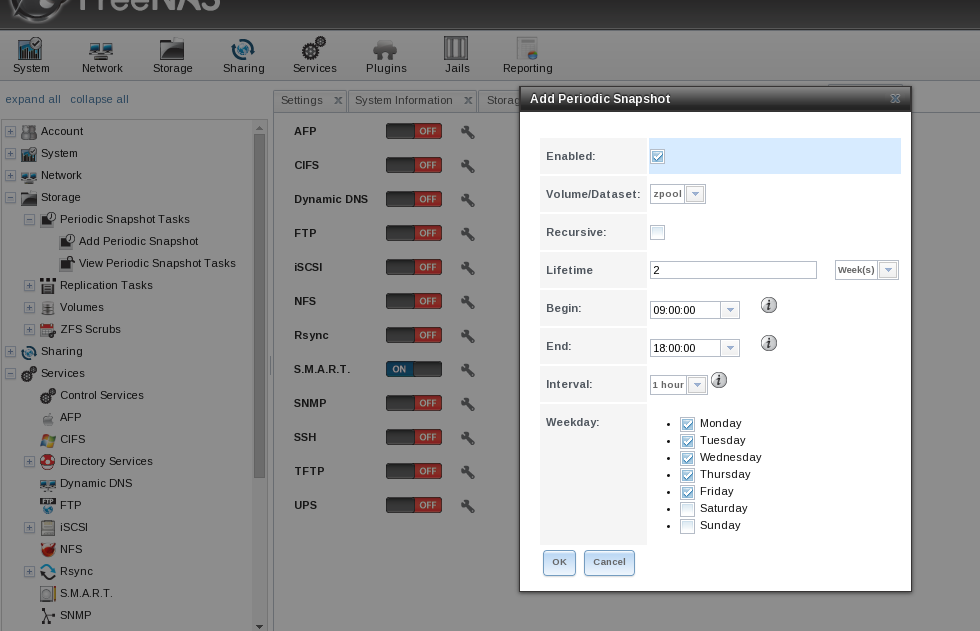
Snapshot
Setting up Freenas
Introduction to freenas does require some hardware configuration. Because the system is based on FreeBSD. General recommendations for this setup are 64-bit processor,At Least 8GB RAM ,FreeNAS is designed and intended to be installed to a small (8-16 GB) flash device, which holds all the software and configuration data. Then we can use disks for storage. Size and number of drives required for your chosen RAID configuration. Important note is that don’t use Freenas on the top of hardware controller which has it’s own cache management.Zfs needs to directly communicate with disks.
Installing the Freenas box
To set up a FREENAS operating system, you will need to download latest stable ISO image from freenas.org page. Once you have written the image to the introduction to freenas install storage option is your choice. On boot you will see the text based menu. You can choose the install/upgrade menu to install the Freenas box.
Post-install Configuration
Once you have installed your FreeNAS box, reboot, and you will be presented with the FreeNAS console menu.
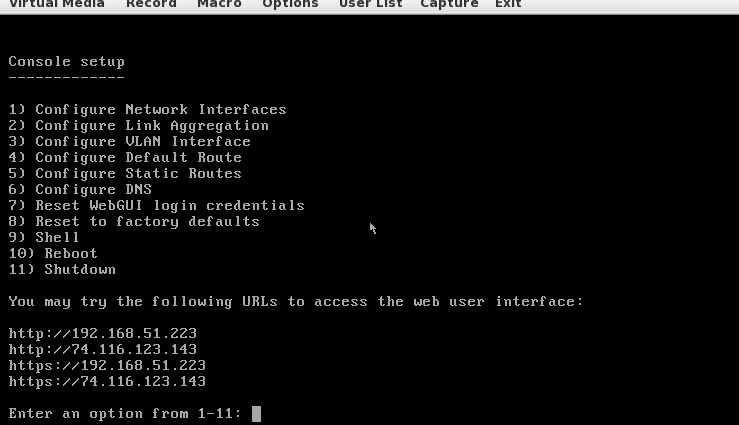
1) Configure Network Interfaces: Provides a configuration wizard to configure the system’s network interfaces.
2) Configure Link Aggregation: Allows you to either create a new link aggregation or to delete an existing link aggregation.
3) Configure VLAN Interface: Used to create or delete a VLAN interface.
4) Configure Default Route: Used to set the IPv4 or IPv6 default gateway. When prompted, input the IP address of the default gateway.
5) Configure Static Routes: Prompts for the destination network and the gateway IP address. Re-enter this option for each route you need to add.
6) Configure DNS: Prompts for the name of the DNS domain, then the IP address of the first DNS server. To input multiple DNS servers, press Enter to input the next until all have been entered. When finished, press Enter twice to leave this option.
7) Reset Root Password: If you are unable to log in to the graphical administrative interface, select this option and follow the prompts to set the root password.
8) Reset to factory defaults: If you want to delete all of the configuration changes made in the administrative GUI, select this option. Once the configuration is reset, the system will reboot. You will need to go to Storage | Volumes | Auto Import Volume to re-import your volume.
9) Shell: Enters a shell to run FreeBSD commands. To leave the shell, type exit .
10) System Update: If any system updates are available, they will automatically be downloaded and applied.
11) Reboot: Reboots the system.
12) Shutdown: Halts the system.
After the configuration setup, we can use the static IP to access the Freenas web console. After the successful login, you can see information about FREENAS server, such as domain name,version,total memory available,system time,uptime,system load,etc and you can access the shell from the GUI console.
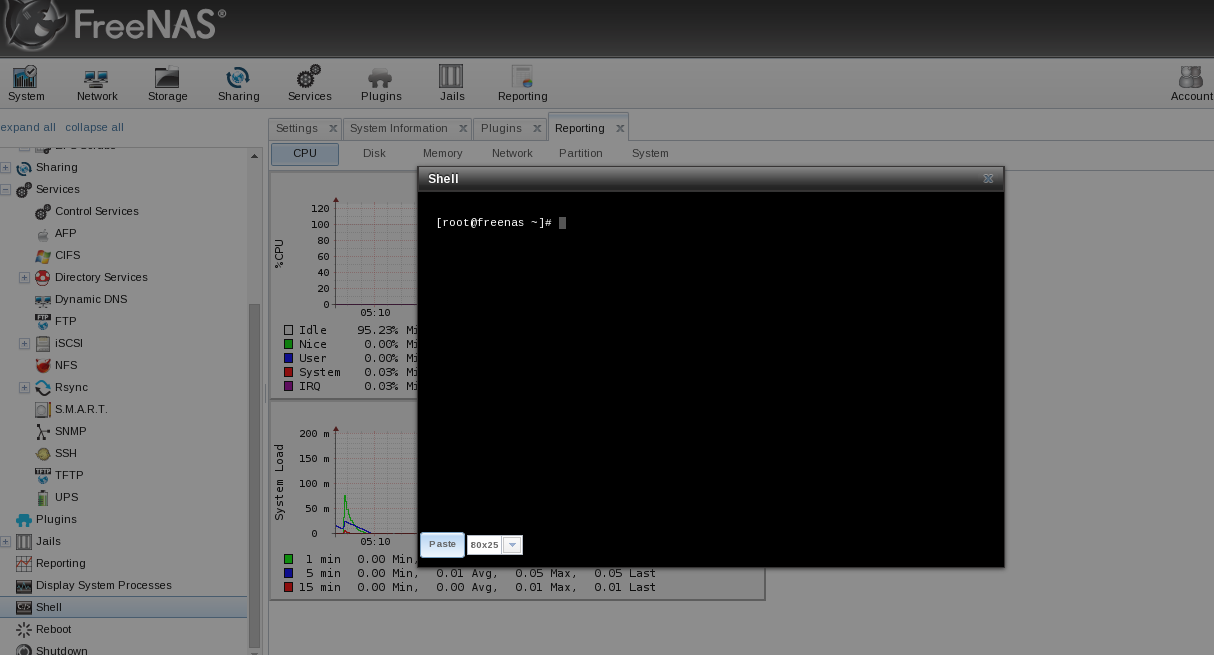
WebShell
Adding ZFS Storage Volumes
To add ZFS storage devices, go to the Storage Menu at the Top to define the ZFS volumes. You can configure the zpool as per your raid configuration. Here I have created the zpool with raidz and added the lz4 compression as well.
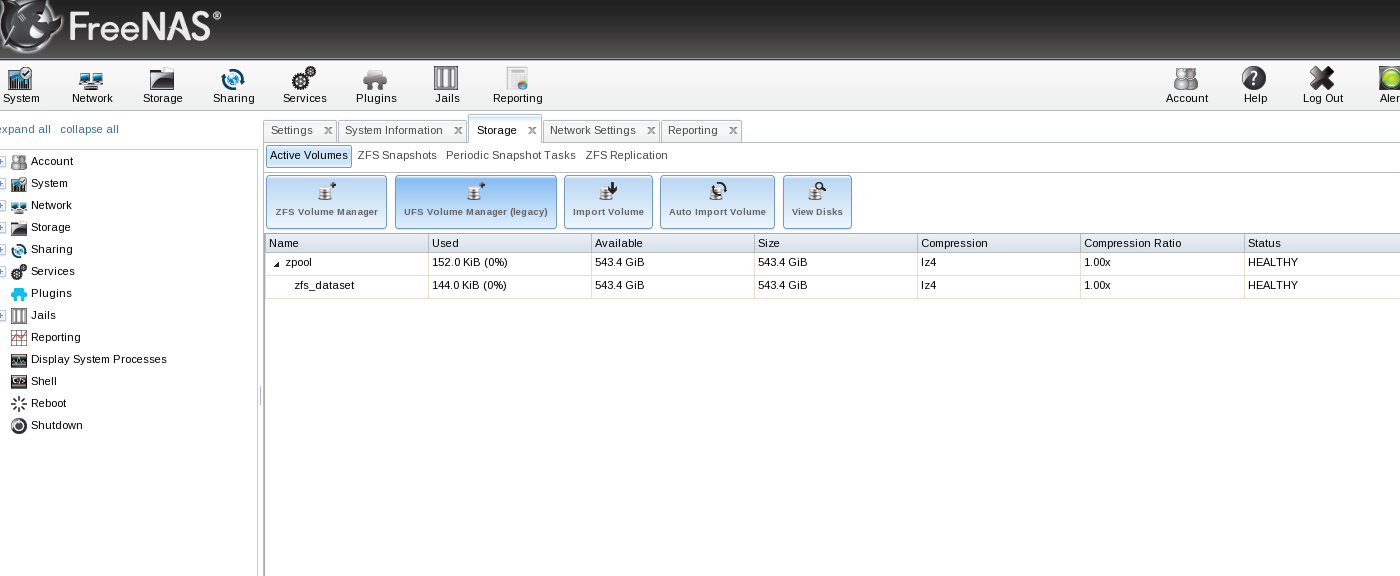
Volumes
Several redundancy options are available when you create a volume. You can choose from the following:
Automatic: Automatically creates a mirrored, RAIDZ1, or RAIDZ2 pool, depending on the number of disks. If you prefer to control the type of redundancy, select one of the other options.
RAID 10: Creates a striped mirror and requires a minimum of four disks.
RAIDZ2: Requires a minimum of four disks. Up to two disks can fail without data loss.
RAIDZ1: Requires a minimum of three disks. Up to one disk can fail without data loss.
Stripe: Requires a minimum of one disk. Provides no redundancy, which means that if any of the disks in the stripe fail, all data in the stripe is lost.
Again, because you have two disks here, you should choose Automatic . This setting will create a mirrored or RAID 1 configuration, providing some fault tolerance at a less expensive price point compared with the many other options requiring many more disks.
Creating a Share
The following types of shares and services are available:
Apple (AFP) Shares: the Apple File Protocol (AFP) type of share is a good choice if all of your computers run Mac OS X.
Unix (NFS) Shares: the Network File System (NFS) type of share is accessible by Mac OS X, Linux, BSD, It is a good choice if there are many different operating systems in your network. Depending upon the operating system, it may require the installation or configuration of client software on the desktop.
WebDAV Shares: this type of share is accessible using an authenticated web browser (read-only) or WebDAV client running on any operating system.
Windows (CIFS) Shares: the Common Internet File System (CIFS) type of share is accessible by Windows, Mac OS X, Linux, and BSD computers, but it is slower than an NFS share due to the single-threaded design of Samba. It provides more configuration options than NFS and is a good choice of a network containing any Windows systems.
Block (iSCSI) shares: this type of share appears as an unformatted disk to clients running iSCSI initiator software or a virtualization solution such as VMware.
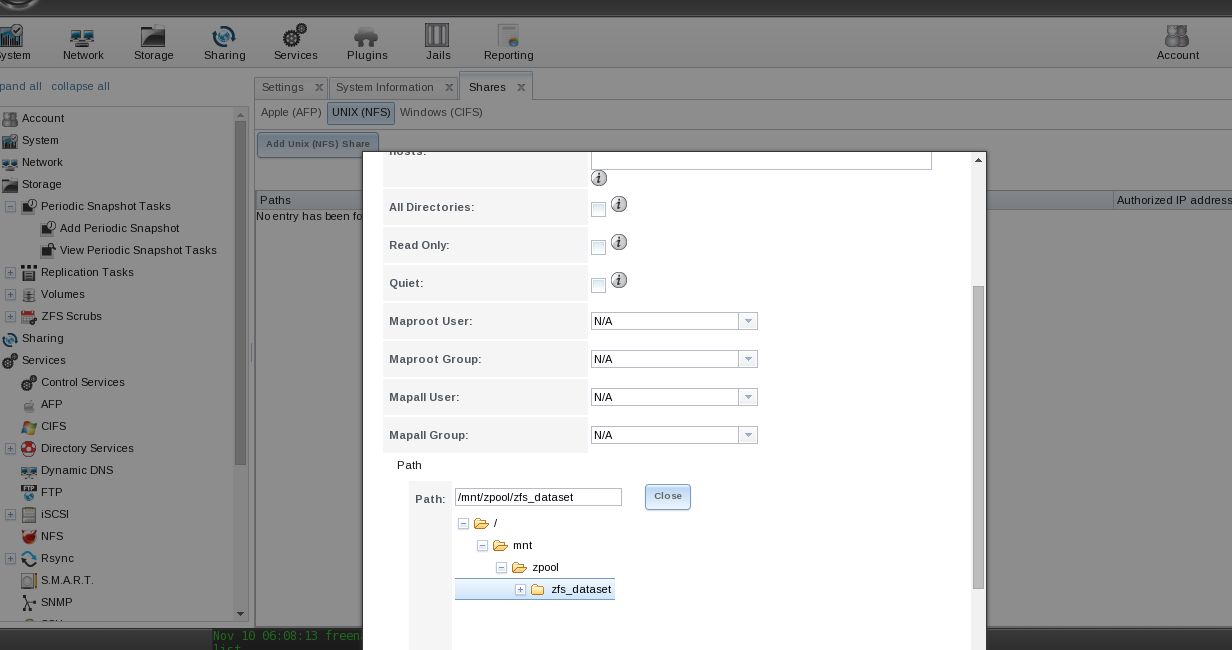
Here is the example for Unix(NFS shares). To share ZFS datasets on Unix machines, go to “Sharing tab”, choose the Unix(NFS) type.ZFS datasets are like subdirectories that have configurable properties independent of their parent filesystem(zpool). We should need to “Add Unix(Share)” and to add the authorized network that should be differ for your network and also need to configure the required data set directory path as well.
Note: Should need to enable the NFS service on the service configuration for sharing.