What is Bacula?
Bacula is a software which permits the system administrator to manage backup, recovery, and verification of computer data across a network of computers of different kinds. The majority of the source code of Bacula is released under the GNU General Public License version 2. Bacula can run entirely upon a single computer and can backup to various types of media, including tape and disk.
In technical terms, it is a network Client/Server based backup program. Bacula is relatively easy to use and efficient, while offering many advanced storage management features that make it easy to find and recover lost or damaged files. Due to its modular design, Bacula is scalable from small single computer systems to systems consisting of hundreds of computers located over a large network.
Why and Who Needs Bacula?
If you are currently using a program such as tar,zip or dump to backup your computer data, and you would like a network solution, more flexibility, or catalog services, Bacula will most likely provide the additional features you want with our IT infrastructure management services. Since it is a sophisticated backup package, the Bacula project does not recommend using Bacula for newbies and those only need to perform basic backup tasks.
Bacula Components or Services
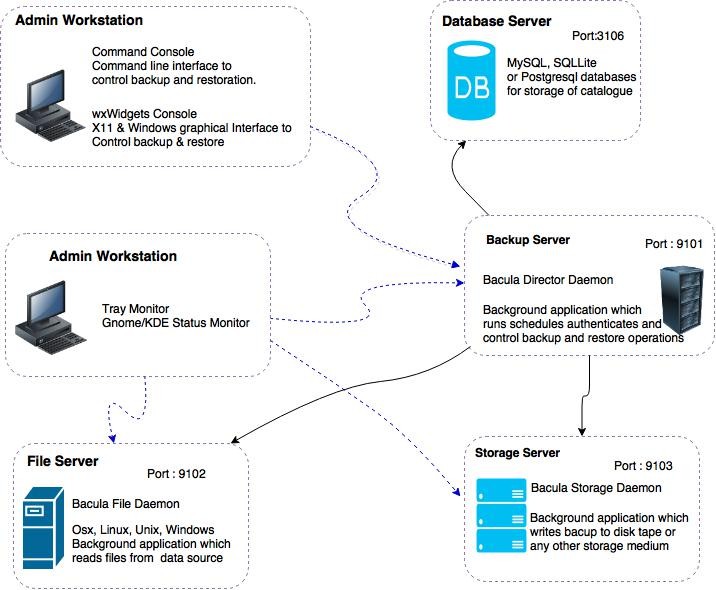
Bacula Components or Services
Bacula is made up of the following five major components or services:
1. Bacula Director (DIR):
Software that controls the backup and restore operations that are performed by the File and Storage daemons. It supervises all the backup, restore, verify and archive operations. The system administrator uses the Bacula Director to schedule backups and to recover files. The Director runs as a daemon (or service) in the background.
2. Storage Daemon (SD):
Software that performs reads and writes on the storage devices used for backups.
3. Database Bacula Console:
The Bacula Console service is the program that allows the administrator or user to communicate with the Bacula Director Currently, the Bacula Console is available in three versions: text-based console interface, QT-based interface, and a wxWidgets graphical interface. The first and simplest is to run the Console program in a shell window (i.e. TTY interface). Most system administrators will find this completely adequate. The second version is a GNOME GUI interface that is far from complete, but quite functional as it has most the capabilities of the shell Console. The third version is a wxWidgets GUI with an interactive file restore. It also has most of the capabilities of the shell console, allows command completion with tabulation, and gives you instant help about the command you are typing.
4. Databases server:
The DB server manages catalog services. Which are comprised of the software programs responsible for maintaining the file indexes and volume databases for all files backed up. The Catalog services permit the system administrator or user to quickly locate and restore any desired file. The Catalog services sets Bacula apart from simple backup programs like tar and bru, because the catalog maintains a record of all Volumes used, all Jobs run, and all Files saved, permitting efficient restoration and Volume management. Bacula currently supports three different databases, MySQL, PostgreSQL, and SQLite, one of which must be chosen when building Bacula.
5. File Daemon (FD):
The File daemon is a program that runs on each (Client) machine. At the request of the Director, finds the files to be backed up and sends them (their data) to the Storage daemon. We have to specify the following things in the file daemon configuration.
• Client – to define what Clients are to be backed up.
• Director – to define the Director’s name and its access password.
• Messages – to define where error and information messages are to be sent.
Installation
For the installtion of Bacula you will need two machines. I done all this on ubuntu 12.04. So please make necessary changes if you are using a RHEL based distribution. I set the hostname of my server as BackupServer and the client machine’s host name is ClientMachine. Change these values to what you are using. You can add respective hosts entries for a better communication across both. If you don’t have proper DNS for the domains it is a mandatory thing.
Client Installation
No local backups will be stored on the remote client machine, so not all of the bacula components need to be installed.
Install the the bacula-fd (file-daemon) and the bconsole (bacula console) on this machine with apt-get using the bacula-client metapackage:
sudo apt-get update
sudo apt-get install bacula-client
Client Machine Configuration
We will only be editing the bacula file daemon configuration file in the client machine. Open the file with root privileges with the following command:
sudo nano /etc/bacula/bacula-fd.conf
We need to modify few items and save some information that we will need for our server configuration. Begin by finding the Director section.
The bacula director is located on the backup server. Change the “Name” parameter to the hostname of your backup server followed by “-dir”.
You have to copy the password that bacula generated for your client file daemon. You have to use it to while are configuring your backup server settings:
Director {
  Name = BackupServer-dir
  Password = "QVw6rZpQkdbJRdkGWOG7luJhn-vu83cG"  # Copy this password for later reference!
}

Next, we need to adjust one parameter in the FileDaemon section. We will change the “FDAddress” parameter to match the IP address or domain name of our client machine. The “Name” parameter should already be populated correctly with the client file daemon name:

FileDaemon {                          # this is me
  Name = ClientMachine-fd
  FDport = 9102                  # where we listen for the director
  WorkingDirectory = /var/lib/bacula
  Pid Directory = /var/run/bacula
  Maximum Concurrent Jobs = 20
  FDAddress = ClientMachine.DomainName.com
}

We also need to configure this daemon to pass its log messages to the backup cloud server. Find the Messages section and change the “director” parameter to match your backup cloud server’s name.

Messages {
  Name = Standard
  director =  BackupServer-dir = all, !skipped, !restored
}
Save the file and exit.
Check that your configuration file has the correct syntax with the following command:
sudo bacula-fd /etc/bacula/bacula-fd.conf
If the command returns no output, the configuration file has valid syntax. Restart the file daemon to use the new settings:
sudo service bacula-fd restart
The client machine is now correctly configured.
In this example, we would like to restore to a folder on this same machine. Create the file structure and lock down the permissions and ownership for security with the following commands:
sudo mkdir -p /bacula/restore
sudo chown -R bacula:bacula /bacula
sudo chmod -R 700 /bacula
The client machine is now configured correctly. Next, we will configure the backup cloud server to pull the file data from the client.
Backup Server Configuration
The major configuration are actually done on the backup server. That is because the bacula “director” manages all other bacula processes and must be able to communicate correctly with a number of different components.
To start, open the “bacula-dir.conf” file with administrator privileges:
sudo nano /etc/bacula/bacula-dir.conf
Job Configuration
Begin by finding the Job Section. The current configuration is named “BackupClient1″ and is used for the backup server’s local backup. We need to change the name to reflect this:
Job {
  Name = "LocalBackup"
  JobDefs = "DefaultJob"
}
Now that we have identified the first job as backing up on the local machine, we want to create a similar job for backup up our remote client. To do this, copy and paste the job definition below the one you just modified.
Change the name to reflect the fact that this is a remote backup scenario. The “Client” parameter identifies our remote client file daemon as the target for our backup. The Pool parameter allows bacula to store its remote backups separate from our local backups. We will define the pool we’re referencing later in the file:
Job {
  Name = "RemoteBackup"
  JobDefs = "DefaultJob"
  Client = ClientMachine-fd
  Pool = RemoteFile
}
Next, define a place for the remote backups to restore. We will use the directory that we created on the client machine to restore remote backups.
Find the “RestoreFiles” job definition. Copy the current entry and paste it below. We will then modify some entries to label it accurately and work with client machine:
Job {
  Name = "RestoreRemote"
  Type = Restore
  Client=ClientMachine-fd
  FileSet="Full Set"
  Storage = File
  Pool = Default
  Messages = Standard
  Where = /bacula/restore
}
Client Configuration
Find the Client definition. We will change the “Address” parameter to reflect our actual backup cloud server IP address instead of using localhost. The password should already be set correctly for the local machine.
Client {
  Name = BackupServer-fd
  Address = BackupServer.DomainName.com
  FDPort = 9102
  Catalog = MyCatalog
  Password = "CRQF7PW-mJumFtENX2lqGvJ6gixPTyRQp"          # password for Local FileDaemon
  File Retention = 30 days            # 30 days
  Job Retention = 6 months            # six months
  AutoPrune = yes                     # Prune expired Jobs/Files
}
The next step is to actually define the client machine that we’ve been referencing in our configuration. Copy the Client entry we just modified paste it below the current definition. This new definition will be for the remote machine that we are backing up.
Match the name to your client machine’s hostname followed by “-fd”. The “Address” line needs to match the client machine’s IP address or domain name as well.
Finally, this is where you enter the password that you copied from the remote client’s file daemon configuration file. Make sure that you modify this password value, or else bacula will not function correctly.
Client {
  Name = ClientMachine-fd
  Address = ClientMachine.DomainName.com
  FDPort = 9102
  Catalog = MyCatalog
  Password = "QVw6rZpQkdbJRdkGWOG7luJhn-vu83cG-"          # password for Remote FileDaemon
  File Retention = 30 days            # 30 days
  Job Retention = 6 months            # six months
  AutoPrune = yes                     # Prune expired Jobs/Files
}
Storage Configuration
Next, change the “Address” parameter in the Storage section with the IP address or domain name of the backup VPS. Once again, the password should already be correct here:
Storage {
  Name = File
# Do not use "localhost" here
  Address = BackupServer.DomainName.com                # N.B. Use a fully qualified name here
  SDPort = 9103
  Password = "097dnj3jw1Yynpz2AC38luKjy5QTnGoxS"
  Device = FileStorage
  Media Type = File
}
Pool Configuration
Find the Pool definitions section. We will first add a parameter to the “File” pool definition. Add the “Label Format” parameter to the definition and choose a prefix to name local file backups. For this guide, local backups will have “Local-” as a prefix.
Pool {
  Name = File
  Pool Type = Backup
  Recycle = yes                       # Bacula can automatically recycle Volumes
  Label Format = Local-
  AutoPrune = yes                     # Prune expired volumes
  Volume Retention = 365 days         # one year
  Maximum Volume Bytes = 50G          # Limit Volume size to something reasonable
  Maximum Volumes = 100               # Limit number of Volumes in Pool
}
Next, we need to copy the section we just modified and paste it below the current entry. This will be set up for remote backup storage.
Change the name of the new pool to reflect its job of storing remote backups. Also, change the prefix by adjusting the “Label Format” parameter to be “Remote-“
Pool {
  Name = RemoteFile
  Pool Type = Backup
  Recycle = yes                       # Bacula can automatically recycle Volumes
  Label Format = Remote-
  AutoPrune = yes                     # Prune expired volumes
  Volume Retention = 365 days         # one year
  Maximum Volume Bytes = 50G          # Limit Volume size to something reasonable
  Maximum Volumes = 100               # Limit number of Volumes in Pool
}
Save and close the file.
Editing bacula-sd.conf
Next, open the “bacula-sd.conf” file with root privileges:
sudo nano /etc/bacula/bacula-sd.conf
Change the “SDAddress” parameter to reflect the backup server’s IP address or domain name:
Storage {                             # definition of myself
  Name = BackupServer-sd
  SDPort = 9103                  # Director's port
  WorkingDirectory = "/var/lib/bacula"
  Pid Directory = "/var/run/bacula"
  Maximum Concurrent Jobs = 20
  SDAddress = BackupServer.DomainName.com
}
Checking the Configuration and Restarting Services
Check the configuration with the following commands:
sudo bacula-dir /etc/bacula/bacula-dir.conf
sudo bacula-sd /etc/bacula/bacula-sd.conf
If no output is returned, the configuration files have valid syntax. If this is the case, restart the daemons to use the new settings:
sudo service bacula-director restart
sudo service bacula-sd restart
Log into the bacula console to test the backup functionality.
sudo bconsole
Test that the bacula director can connect to the remote machine by typing the following:
status
Status available for:
     1: Director
     2: Storage
     3: Client
     4: All
Select daemon type for status (1-4):
Choose #3 to check on the client connection and then select the remote machine:
3: Client
2: ClientMachine-fd
It should return a summary with some statistics, confirming that we can connect to the remote file daemon.
Run a test backup of the remote system by typing the following command:
run
Automatically selected Catalog: MyCatalog
Using Catalog "MyCatalog"
A job name must be specified.
The defined Job resources are:
     1: LocalBackup
     2: RemoteBackup
     3: BackupCatalog
     4: RestoreFiles
     5: RestoreRemote
Select Job resource (1-5):
Select the “RemoteBackup” option to run a backup of the remote machine. Type “yes” to begin the backup:
2: RemoteBackup
The director will send the backup task to the remote file daemon and which will pass its information to the backup server’s storage daemon. You can check the status of the job using the “status” command as we did above. You should also check the messages using the “messages” command.
messages
If you continue to check messages, eventually you will receive a summary of the backup operation. It should contain the line “Termination: Backup OK” if everything went as expected.